Getting rid of “will be checked for errors at next reboot”

Some of my virtual servers running Ubuntu 16.04.4 showed a hint whenever logging in:

*** /dev/vda1 will be checked for errors at next reboot ***

This issue persisted already for quite a while. Rebooting seems not to help, and also the tips from the blog post “When “disk will be checked for errors at next reboot” won’t go away in Ubuntu” did not help in my case.

Further exploration showed that “Last checked” as shown when using sudo tune2fs -l /dev/vda1 indeed had a very old date. Is the file system check actually executed? Closely observing the reboot process showed that fsck.ext4 is executed:

Begin: Loading essential drivers ... done.
Begin: Running /scripts/init-premount ... done.
Begin: Mounting root file system ... 
Begin: Running /scripts/local-top ... done.
Begin: Running /scripts/local-premount ... done.
Begin: Will now check root file system ... fsck from util-linux 2.27.1
[/sbin/fsck.ext4 (1) -- /dev/vda1] fsck.ext4 -a -C0 /dev/vda1

However, the execution returns with a notice that the file system is “clean”. It seems that this does not lead to the date being updated. The man page documents the -f (force) flag to force a check. Digging in the scripts run at boot time (/usr/share/initramfs-tools/scripts/) unveiled that the scripts do add the -f flag in case the kernel parameter forcefsck is used.


So I added the flag in /etc/default/grub to the default Linux kernel arguments:

GRUB_CMDLINE_LINUX_DEFAULT="quiet forcefsck"

And updated grub

sudo update-grub

On the next reboot fsck.ext4 got called with the -f flag and did a proper file system check. And with that, the message on login disappeared.

Note: With forcefsck a full file system check is getting executed on every reboot. This might be not ideal for every environment. It seems that fsck.ext4 and the initramfs scripts do not agree on when a check is actually necessary.

Note 2: All machines also have been upgraded from previous Ubuntu LTS versions so it might be related to that.

Hibernate Debian running on Google Compute Engines preemptible VM

Googles Compute Engine VMs which are configured preemptible are massively cheaper than regular VMs, typically a fourth or even a fifth of the price of a regular machine. It seems quite lucrative for everything which is not mission critical.

However, it can be quite annoying when all state gets lost. Luckily Google does not just turn off the machine but sends an ACPI G2 Soft-Off signal. With Debian 9 (stretch) the ACPI daemon is processing the ACPI signals (acpid) and by default shuts down the machine. This post shows how to use hibernate instead.

Note: Since Google might start the machine on a different (virtual) hardware resuming the machine might not succeed, or even worse, lead to adverse effects. In practice, it seems to work quite well for me 🙂

Continue reading “Hibernate Debian running on Google Compute Engines preemptible VM”

i.MX 7 Cortex-M4 memory locations and performance

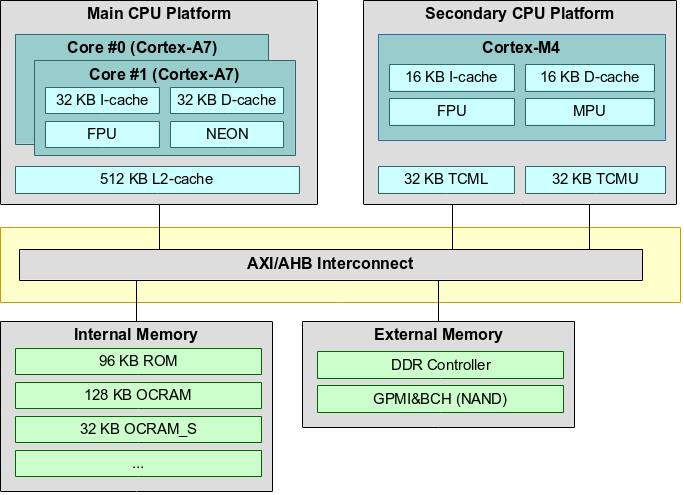
The NXP i.MX 7 SoC heterogeneous architecture provides a secondary CPU platform with a Cortex-M4 core. This core can be used to run a firmware for custom tasks. The SoC has several options where the firmware can be located: There is a small portion of Tightly Coupled Memory (TCM) close to the Cortex-M4 core. A slightly larger amount of On-Chip SRAM (OCRAM) is available inside the SoC too. The Cortex-M4 core is also able to run from external DDR memory (through the MMDC) and QSPI. Furthermore, the Cortex-M4 uses a Modified Harvard Architecture, which has two independent buses and caches for Code (Code Bus) and Data (System Bus). The memory addressing is still unified, but accesses are split between the buses using addresses as discriminator (addresses in the range 0x00000000-0x1fffffff are loaded through the code bus, 0x20000000-0xdfffffff are accessed through the data bus).

i.MX 7 Simplified Architecture Overview

Continue reading “i.MX 7 Cortex-M4 memory locations and performance”

OpenEmbedded recipes for WireGuard VPN

This weekend I finally came around to create OpenEmbedded recipes for WireGuard. The recipe currently awaits review and hopefully will get part of the meta-networking layer, part of the meta-openembedded repository of the upstream OpenEmbedded project. There are two recipes, one for the kernel module and one for the user space tools. The user space tools have the kernel module as a dependency, hence it is sufficient to install the wireguard-tools package, e.g. by using IMAGE_INSTALL_append in your local.conf:

IMAGE_INSTALL_append = " wireguard-tools"

The kernel module needs at least a kernel version 3.18 or later and has some requirements regarding kernel configuration. The WireGuard website maintains a list of kernel requirements. If you are using the Yocto kernel, the netfilter kernel feature (features/netfilter/netfilter.scc) is enabled by default and seems to be sufficient to run WireGuard. To get started with WireGuard, refer to the excellent Quick Start guide on wireguard.io.

WireGuard on MIPS64
WireGuard on MIPS64

Continue reading “OpenEmbedded recipes for WireGuard VPN”

WireGuard, LEDE and some IPv6 fun

Today I upgrading my router to LEDE 17.01 and played a bit with IPv6 and WireGuard VPN tunnels. My Internet connection at home (connected via Cable to the Comcast network) has decent IPv6 support, which I wanted to enjoy also when on the road, using non-IPv6 networks. The first step is to setup a Wireguard tunnel, which I already did some months ago (Dan Lüdtke, author of the LEDE/OpenWrt web interface plugin for Wireguard has a good post on thatUpdate April: Dan has a new post which does not make use of the stacked approach. This is suitable for lots of regular setups. However, the IPv6 address setup with automatic network assignment described here is only supported by using stacked interfaces, hence this article keeps using that configuration). In my setup the Wireguard IPv4 network uses a network from the private range (192.168.2.0/24) to route IPv6 traffic. For IPv6 my goal was to assign a public subnet, so I can access the IPv6 network without any NAT directly through the tunnel. In IPv6 world, NAT is a technology which is not commonly used/considered deprecated anyway. Note that this how-to does not route the IPv4 traffic to the internet through the VPN tunnel, only IPv6 traffic.

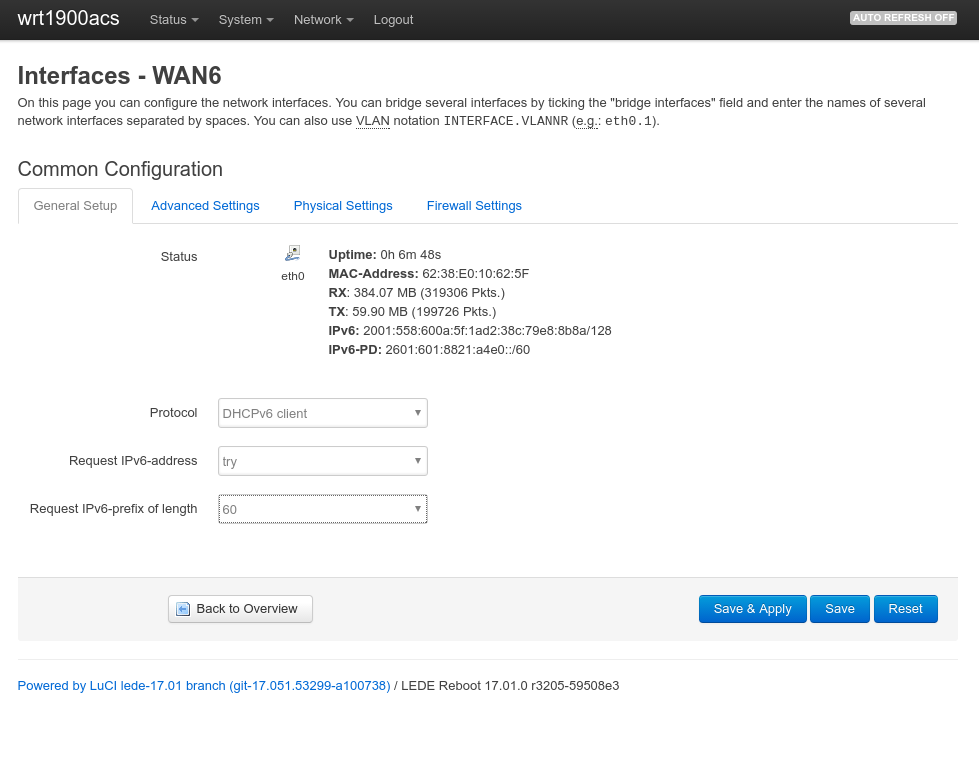
First, a large enough IPv6 prefix needs to be available on the router in order to assign two independent IPv6 networks to my local LAN and the Wireguard VPN. One has to realize that in IPv6 world, subnets are by definition between /49 and /64. One cannot create a subnet /72 or similar since the last 64 bits are the host portion, reserved exclusively for host addresses. By default, LEDE requested a 64 bit IPv6-prefix from the provider, but this can be changed in the WAN6 network interface settings:


Continue reading “WireGuard, LEDE and some IPv6 fun”

KVM with kvmtool on ARMv7

In this third part about KVM on ARMv7 I use kvmtool as the user-space part of the hypervisor. This lightweight hypervisor allowed me to run up to 72 virtual machines…  This does not really serves any purpose other than demonstrating what is possible :-). See the video in the end how that looked like.

In 2011 Pekka Enberg announced kvmtool (native Linux KVM tool). Initially it was meant to live within the Linux kernel source tree, but it ended up in a separate git repository on kernel.og.. In between it has been ported to several architectures too, including ARM and ARM64. Its binary usually goes with the name lkvm. It strictly depends on KVM and is otherwise kept rather lean.

Similar to the previous blog post, I used a host root file system based on Ångströms development image. kvmtool was not yet available in any OpenEmbedded layer, hence I had to write a new recipe (it should turn up in the meta-virtualization layer mailing list soon). Continue reading “KVM with kvmtool on ARMv7”

Using KVM with Qemu on ARM

This is part two of my blog post about Kernel-Virtual Machine (KVM) on a 32-Bit ARM architecture. The post is meant as a starting point for those who want to play with KVM and provide a useful collection of Qemu commands for virtualization.

Virtualization host setup

The Kernel configuration I used for my platforms Host kernel can be found here. Since I run my experiments on a Toradex Colibri iMX7D module, I started with the v4.1 configuration of the BSP kernel and updated that to v4.8 plus enabled KVM as well as KSM (Kernel same-page merging).

As root file system I use a slightly modified version of the Ångström distributions “development-image”, version 2015.12 (built from scratch with OpenEmbedded). Any recent ARM root file system should do it. I let Qemu v2.6.0 preinstall (by just adding “qemu” to the image and specifying ANGSTROM_QEMU_VERSION = “2.6.0” in conf/distro/angstrom-v2015.12.conf).

Virtualization guest setup

For the virtualization guest setup I was looking for something minimalistic. I uploaded the compiled binary of the Kernel (as tared zImage) and initramfs (as cpio.gz).

I built a custom kernel directly using v4.7 sources and a modified/stripped down version of the vexpress_defconfig (virt_guest_defconfig). I found it useful to look into Qemu’s “virt” machine setup code (hw/arm/virt.c) to understand what peripherals are actually emulated (and hence what drivers are actually required). Continue reading “Using KVM with Qemu on ARM”

U-Boot/Linux and HYP mode on ARMv7

The newer ARMv7 Cortex-A class cores such Cortex-A7, A15 and A17 come with a virtualization extensions which allow to use KVM (kernel virtual machine). The NXP i.MX 7Dual SoC which I worked with lately includes the ARM Cortex-A7 CPU. I went ahead and tried to bring up KVM on i.MX 7. I was not really familiar with the ARMv7 virtualization architecture, so I had to read up on some concepts. This post summarizes what I learned and gives a big picture of software support.

The Hypervisor mode

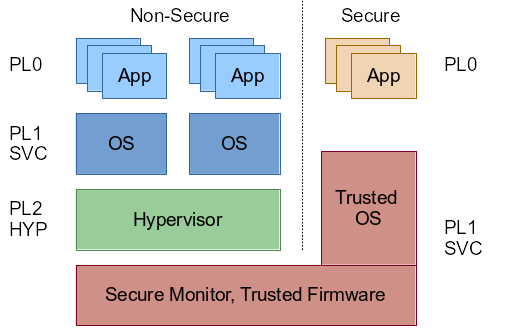
To provide hardware support for full CPU virtualization an additional privilege level is required. User-space (PL0) uses the SVC (Supervisor) instruction to switch to kernel-space (PL1, SVC mode). A similar separation between Kernel and hypervisor is required. The ARMv7 architecture with virtualization extension calls this privilege level PL2 or HYP mode.

Linux with KVM for ARM uses this mode to provide CPU virtualization. The CPU needs to be in HYP mode when Linux is booting so KVM can make use of the extension. How KVM uses the HYP mode in detail is explained in this excellent LWN article. After building a kernel with KVM support, I encountered this problem first: By default, the system did boot in SVC mode.

...
Brought up 2 CPUs
CPU: All CPU(s) started in SVC mode.
...
kvm [1]: HYP mode not available
...

Secure and Non-Secure world

ARMv7 privilege levels

To understand how to switch into Hypervisor mode, one needs to understand the whole privilege level architecture first. Notable here is that on ARMv7 CPU’s the HYP mode is only available in non-secure mode, by design. Any hypervisor needs to operate in non-secure mode, there is no virtualization extension in secure mode. Continue reading “U-Boot/Linux and HYP mode on ARMv7”

Using the perf utility on ARM

Given two systems, both with a Cortex-A5 CPU, one clocked at 396MHz without L2 cache and one clocked at 500 MHz with 512kB L2 cache. How big is the impact of the L2 cache? Since the clock frequency is different, a simple CPU time comparison of a given program does not answer the question… I tried to answer this question using perf. perf is often used to profile software, but in this case it also proved to be useful to compare two different hardware implementations.

Most CPU’s nowadays have internal counters which count various events (e.g. executed instructions, cache misses, executed branches and branch misses etc…). Other hardware, e.g. cache controllers, might expose performance counters too, but this article focuses on the hardware counters exposed by the CPU. Continue reading “Using the perf utility on ARM”