Thread border router technical deep-dive (part 1)

This blog post series documents some deeper technical details on how Thread works, in particular border routers. Most of my insights are from real world findings while working on the OpenThread Border Router add-on for Home Assistant.

Thread is an IPv6-based, low-power mesh networking technology for Internet of things (IoT) products.” according to the Wikipedia article of the Thread protocol, and that really sums it up nicely. Thread is based on the same physical layer as Zigbee: IEEE 802.15.4. Unlike Zigbee, Thread provides IP connectivity. It does not specify the application level protocol, e.g. how to actually control a light bulb. This is where other protocols come in, like Matter. Similar to Zigbee, some Thread devices act as routers within the mesh. However, there is no single predefined coordinator like in Zigbee networks. There is a single Thread leader in every Thread partition which manages the Thread routers. The Thread leader is selected automatically. And there can be multiple border routers which allow communication with Thread devices. This redundancy avoids a single point of failure and can also improve connectivity with the mesh. In my opinion, the use of IP, and the fact that multiple border routers can provide connectivity to the main network are the biggest advantages of Thread and sets it really apart from existing mesh networks.

This article is mostly focusing on this Thread border routers. To learn more about Thread in general, the excellent Thread Primer on openthread.io is a very good resource and is probably a good read in case you are not that familiar with Thread yet. This first part focuses on describing what type of IPv6 network prefixes are in use in a Thread network.

Continue reading “Thread border router technical deep-dive (part 1)”
gedit open file pop-up

With the update to Gnome 3.36 gedit unfortunately removed the old open file pop-up (a screenshot of the old pop-up can be found in this how-to on howtogeek.com). In the commit message of the removal the developer mostly cites maintenance burden as the main reason. As a developer I can relate to that and it does make sense to avoid duplicating functionality (and code) which is already present elsewhere. However, I also must say that with the pop-up I somehow always managed to find the documents I was looking for, but the file open dialog’s recent history in its default configuration just does not show enough documents to find the ones I need. This post lists two improvements I found useful.

Continue reading “gedit open file pop-up”

Getting coredumps of Qemu on Fedora

Recently it happened that a virtual machine crashed reproducible. journalctl contained messages from audit indicating the crash:

audit[88047]: ANOM_ABEND auid=4294967295 uid=107 gid=107 ses=4294967295 subj=system_u:system_r:svirt_t:s0:c422,c704 pid=88047 comm="qemu-system-x86" exe="/usr/bin/qemu-system-x86_64" sig=6 res=1

I was hoping to get a coredump from it, however, coredumpctl had no corefile (COREFILE column read “none”). There was another message in journalctl which also showed the reason:

systemd-coredump[90346]: Resource limits disable core dumping for process 88047 (qemu-system-x86).

However, ulimit -a (even as user qemu) showed that core file size is unlimited. It seems that something (probably virsh) adjusts limits for that particular process (Max core file size is set to 0 and 0 bytes). Continue reading “Getting coredumps of Qemu on Fedora”

zsmalloc performance on ARM64 platform

To use zram the Linux kernel zsmalloc needs to be enabled. The zsmalloc functionality in turn allows to use two methods to access allocations of multiple pages: Copy-based or using VM mapping. Depending on platform one or the other is faster, and the configuration option already suggests that ARM the VM mapping method is typically faster. Hence I was wondering whether that is also true for ARM64 platforms (running in Aarch64 mode). Outcome: On a quad Cortex-A35 platform using Linux 4.14 VM mapping was ~20-50% faster.

Continue reading “zsmalloc performance on ARM64 platform”

ARM Linux Kernel early startup code debugging

This post shows how to debug early (pre-decompression/pre-relocation) initialization code of an ARM (Aarch32) Linux kernel. Debugging kernel code is often not needed and anyway rather hard due to the interaction with real hardware and concurrency in play.  However, to watch, read and learn about early ARM initialization code, debugging can be really useful. Early Initialization is running without concurrency anyway, so this is not a problem in this case.

Before starting, I assume you have a working ARM cross compile environment, a compiled kernel and Qemu at hand. Make sure to compile the kernel with debug symbols (CONFIG_DEBUG_KERNEL=y and CONFIG_DEBUG_INFO=y). I use the following arguments to start Qemu:

$ /usr/bin/qemu-system-arm -s -S -M virt -smp 1 \
  -nographic -monitor none -serial stdio \
  -kernel arch/arm/boot/zImage \
  -initrd core-image-minimal-qemuarm.cpio_.gz \
  -append "console=ttyAMA0 earlycon earlyprintk"

Especially the arguments -s -S are notable here, since the former makes sure Qemu’s built-in debugger is available at port 1234 and the latter stops the machine. This now allows to connect to Qemu using gdb. I use the gdb from my ARM cross compiler toolchain. Once I have a gdb prompt, lets immediately enable gdb’s automatic disassembler on next line before connecting:

$ arm-buildroot-linux-gnueabihf-gdb
...
(gdb) set disassemble-next-line on
(gdb) show disassemble-next-line
Debugger's willingness to use disassemble-next-line is on.
(gdb) target remote :1234
Remote debugging using :1234
0x40000000 in ?? ()
=> 0x40000000: 00 00 a0 e3 mov r0, #0

Continue reading “ARM Linux Kernel early startup code debugging”

iptable prevents nftables to be loaded

Since a while I am using nftables for my firewalling needs. My nftables.conf has some prerouting settings. After playing with docker, I had the issue that I was no longer able to reload my nftables:

/etc/nftables.conf:12:9-18: Error: Could not process rule: Device or resource busy
chain prerouting {
^^^^^^^^^^

Also disabling the Docker service did not help. It seems that the kernel module iptable_nat needs to be removed, but this is currently in use:

# rmmod iptable_nat
rmmod: ERROR: Module iptable_nat is in use

There are some iptable rules/chains active which prevent the module from unloading. By clearing the iptable configuration, especially the nat table, it is possible to remove iptable_nat and then using nftables again.

iptables -F
iptables -X
iptables -t nat -F
iptables -t nat -X
iptables -t mangle -F
iptables -t mangle -X


Ubuntu 18.04 LTS (Bionic Beaver) Server Installer differences

Ubuntu 18.04 LTS Server comes now in two flavors with different installers:

  • Ubuntu Server (new Ubuntu-specific Subiquity installer, ubuntu-18.04-live-server-amd64.iso)
  • Alternative Ubuntu Server installer (Debian installer, ubuntu-18.04-server-amd64.iso)

Canonical itself refers to the traditional installer for advanced networking and storage features. However, there are also other differences, this blog post looks into them.

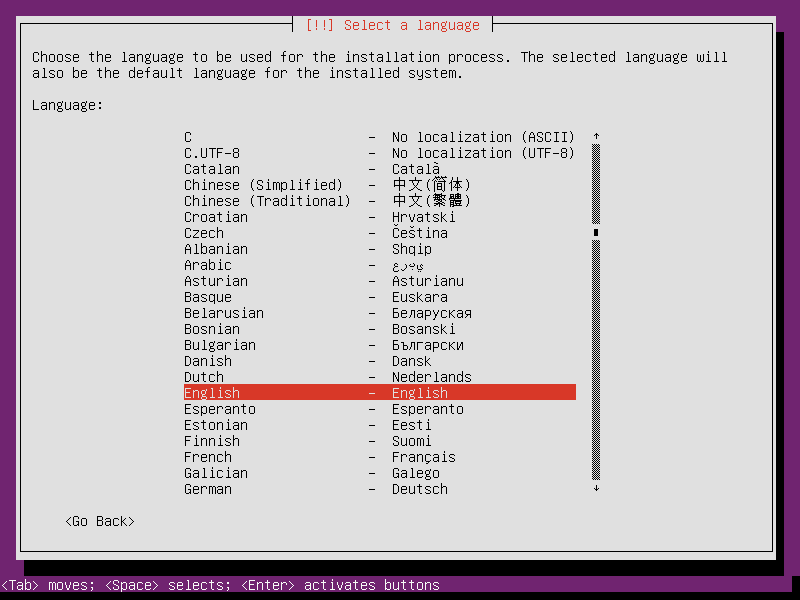
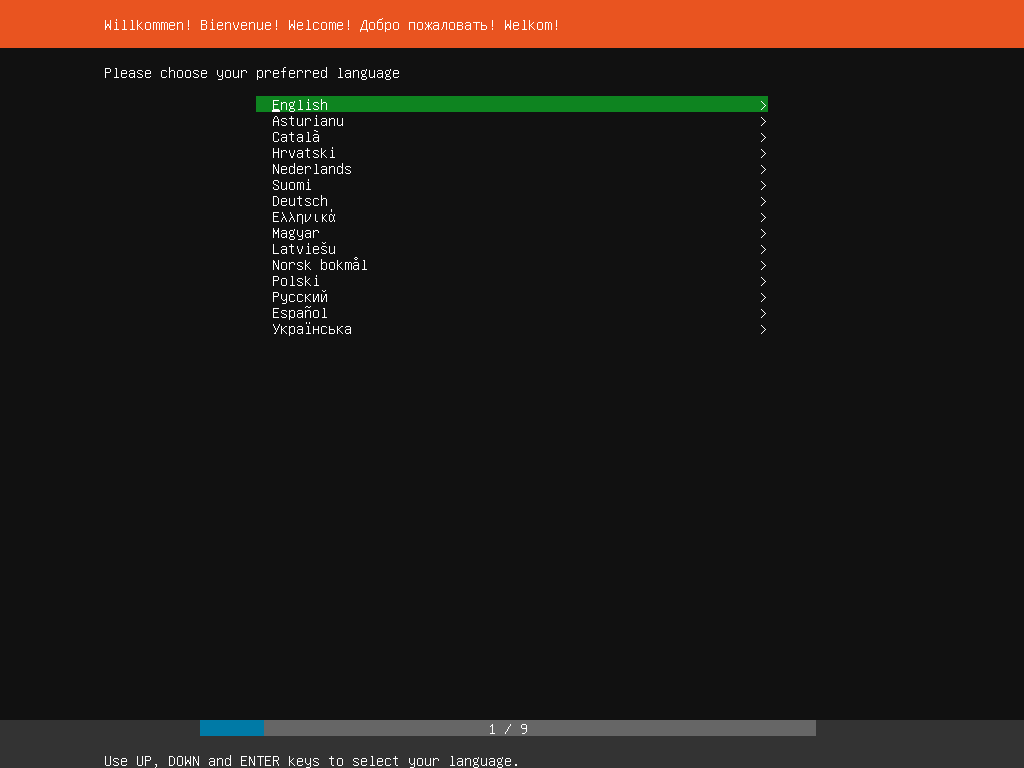
Ubuntu 18.04 LTS Server Live (Subiquity)

Ubuntu 18.04 LTS Server (Debian Installer)

Continue reading “Ubuntu 18.04 LTS (Bionic Beaver) Server Installer differences”

Hibernate Debian running on Google Compute Engines preemptible VM

Googles Compute Engine VMs which are configured preemptible are massively cheaper than regular VMs, typically a fourth or even a fifth of the price of a regular machine. It seems quite lucrative for everything which is not mission critical.

However, it can be quite annoying when all state gets lost. Luckily Google does not just turn off the machine but sends an ACPI G2 Soft-Off signal. With Debian 9 (stretch) the ACPI daemon is processing the ACPI signals (acpid) and by default shuts down the machine. This post shows how to use hibernate instead.

Note: Since Google might start the machine on a different (virtual) hardware resuming the machine might not succeed, or even worse, lead to adverse effects. In practice, it seems to work quite well for me 🙂

Continue reading “Hibernate Debian running on Google Compute Engines preemptible VM”

i.MX 7 Cortex-M4 memory locations and performance

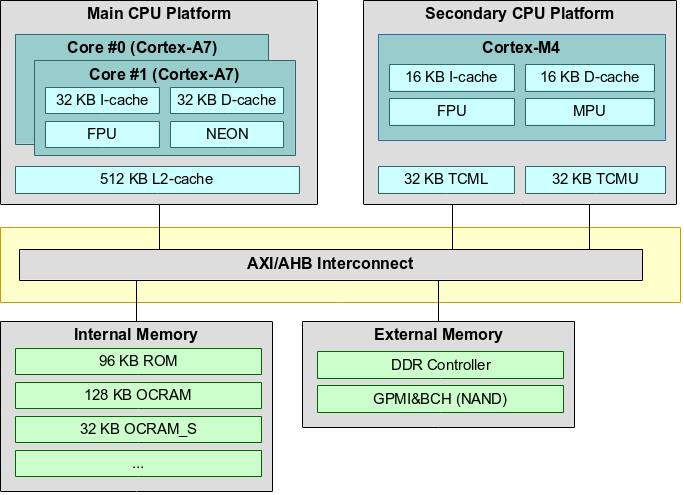
The NXP i.MX 7 SoC heterogeneous architecture provides a secondary CPU platform with a Cortex-M4 core. This core can be used to run a firmware for custom tasks. The SoC has several options where the firmware can be located: There is a small portion of Tightly Coupled Memory (TCM) close to the Cortex-M4 core. A slightly larger amount of On-Chip SRAM (OCRAM) is available inside the SoC too. The Cortex-M4 core is also able to run from external DDR memory (through the MMDC) and QSPI. Furthermore, the Cortex-M4 uses a Modified Harvard Architecture, which has two independent buses and caches for Code (Code Bus) and Data (System Bus). The memory addressing is still unified, but accesses are split between the buses using addresses as discriminator (addresses in the range 0x00000000-0x1fffffff are loaded through the code bus, 0x20000000-0xdfffffff are accessed through the data bus).

i.MX 7 Simplified Architecture Overview

Continue reading “i.MX 7 Cortex-M4 memory locations and performance”

OpenEmbedded recipes for WireGuard VPN

This weekend I finally came around to create OpenEmbedded recipes for WireGuard. The recipe currently awaits review and hopefully will get part of the meta-networking layer, part of the meta-openembedded repository of the upstream OpenEmbedded project. There are two recipes, one for the kernel module and one for the user space tools. The user space tools have the kernel module as a dependency, hence it is sufficient to install the wireguard-tools package, e.g. by using IMAGE_INSTALL_append in your local.conf:

IMAGE_INSTALL_append = " wireguard-tools"

The kernel module needs at least a kernel version 3.18 or later and has some requirements regarding kernel configuration. The WireGuard website maintains a list of kernel requirements. If you are using the Yocto kernel, the netfilter kernel feature (features/netfilter/netfilter.scc) is enabled by default and seems to be sufficient to run WireGuard. To get started with WireGuard, refer to the excellent Quick Start guide on wireguard.io.

WireGuard on MIPS64
WireGuard on MIPS64

Continue reading “OpenEmbedded recipes for WireGuard VPN”